MY FIRST HOMEMADE CROISSANTS
- Sam

- Jul 17, 2025
- 14 min read
Updated: Jul 21, 2025

This was my very first time making croissants and honestly it was daunting..and I had been putting it off for quite some time. I am following a recipe from The Flavor Bender, and I found it fairly simple to break down the steps! The one change I would make (and did in this recipe below) is adding an additional ½ tsp. more salt to the dough.
After making my first batch I thought it might be helpful to break down the recipe in a one-sheet similarly to my sourdough bread cheat sheet.
INGREDIENTS
DOUGH
⅓ cup Milk, lukewarm
1 tsp. Honey
2 tsp. Active Dry Yeast
¼ cup Water, lukewarm
1½ tbs. Unsalted Butter, melted and cooled
1½ tbs. Granulated Sugar
2 cups All-Purpose Flour
1½ tsp. Salt
BUTTER BLOCK
10 tbs. Unsalted Butter
EGG WASH
1 Egg Yolk, large
2 tbs. Milk and/or Cream
The active time for this recipe is about 90 minutes, inactive time is about 5 hours. Additionally, there are 2 nights of resting which stretches the whole recipe to 3 days.
INSTRUCTIONS
DOUGH
Dissolve the honey in the milk in a mixing bowl, and then whisk in the yeast. Set aside for the yeast to activate for about 10-20 minutes.
Add the rest of the ingredients into the bowl in the order listed in the ingredients list. Stir with a spatula or spoon to mix it into a scraggly dough.
Using your hand, knead the dough for about 1-2 minutes until a scraggly dough is formed.
Take the dough out of the bowl and knead it on a work surface until smooth, about 4 minutes. You shouldn’t have to put too much effort into kneading here because it isn’t a very stiff dough. Place the dough back in the mixing bowl and cover with plastic wrap.
Keep the bowl in a warm place, and proof until at least doubled in size (this can take about 1 hour).
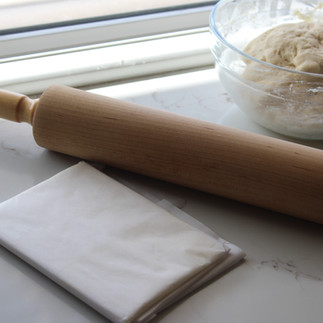
After the first proof, turn the dough out onto a lightly floured surface and flatten it to knock out the air. Transfer the dough onto the second (larger) parchment paper and shape it into a rectangle. Fold the other half of the parchment paper over the dough, forming a 7x10 inch case. Use a rolling pin to roll out the dough to fit the 7x10 inch rectangle. (It doesn’t have to fill the 7x10 inch rectangle perfectly, just as closely as possible).
Cover the parchment paper encased dough well in plastic wrap, and place it in a quarter sheet pan. Freeze for at least a few hours, or overnight.
BUTTER BLOCK
Slice the cold butter into thin slices.
Arrange them on the 1st parchment paper (the smaller one), within the 5x6.5 inch marked rectangle. Fold the parchment paper over to enclose the butter.
Using a rolling pin, firmly hit the butter to make it more pliable. Then, using the rolling pin, roll out/spread the butter inside the parchment paper.
Make sure to roll the butter out into the corners, but also keep the butter evenly thick.
Transfer this butter block into the fridge until completely hardened (or overnight).
ENCLOSING THE BUTTER
When laminating the butter and dough, it’s REALLY crucial that they both have similar pliability and are cold. If my dough is frozen solid, I keep it at room temp for about 30 minutes to let it soften slightly, before starting the lamination process.
The butter block is removed from the fridge just before lamination, but made pliable by knocking a rolling pin against it repeatedly. It should remain cold.
Remove the parchment paper from the dough and place it on an un-floured (or very lightly floured) work surface. If it’s not quite a 7x10 inch rectangle, roll it out to the correct size, making sure it’s still evenly thick.
Unwrap the parchment paper from the butter block, but keep the butter still attached to the parchment paper.
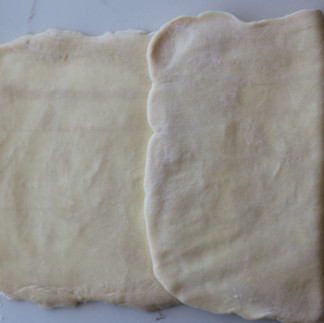
Place the butter block on one half of the dough. There should be a very small border around the butter block and it should still have the parchment paper on top. Once the butter is correctly in place, pat it onto the dough to let it “bind” to the dough. Carefully peel off the parchment paper.
Fold the dough over the butter, end to end, completely enclosing the butter. Press the edges to seal the butter inside the dough. Pat the dough again to help the butter “bind” to the dough.
The dough should still be very cold. If it isn’t, wrap it and put it back in the fridge for about 30 minutes.
FIRST LAMINATION (DOUBLE FOLD)
Generously flour your work surface and dough. Place the dough on the work surface and using the rolling pin, gently press, along the length of the dough, to make sure the butter is pliable.
While maintaining the 5 inch width (short end), roll out the dough to a length of approximately 16 inches.
Use flour as needed to make sure the dough doesn’t stick to the counter, and use your hands to keep the width even and straight. (You can also gently lift the dough as you roll to make sure it isn’t sticking to the countertop).
Work quickly to keep the dough and butter cold. If the butter softens too much, return the dough to the fridge or freezer.
Brush off excess flour on the work surface using a large pastry brush. Trim just a little piece of dough along the edges, to make the width straight.
Fold in about ⅛ of the dough towards the middle (about 2-3 inches). Bring the other end to meet the folded end. Make sure the two ends are as close together as possible with no gaps. Using a paring knife, make small cuts at the four corners of the folds to release the tension (4 cuts; please see pictures in the post).
Brush off excess flour on the surface of the dough. Now, fold the dough in half. Firmly tap the dough to keep the shape. Again, make cuts at the corners of the fold (2 cuts).
Wrap the dough with plastic wrap and refrigerate for at least 30 minutes (60 minutes is even better).
SECOND LAMINATION (SINGLE FOLD)
Generously flour the work surface and place the dough on it. Gently press into the dough with a rolling pin along the length of it to make sure the butter inside is pliable.
Keeping the short end as the width (about 4 inches), roll out the dough to 15 inches. As you roll out the dough, make sure the final width is kept to about 5 inches. Also make sure the dough isn’t sticking to the work surface, and the width is straight and even.
Brush off excess flour from the surface of the dough using a pastry brush.
Fold in ⅓ of the dough towards the center, about 5 inches. As before, cut the corners of the fold with a paring knife to release tension.
Brush off excess flour again, and fold the other edge of the dough OVER the first fold. Cut the folded corners with a paring knife to release tension.
Wrap the dough in plastic wrap and refrigerate for another 30 minutes (preferably 60 minutes).
SHEETING THE DOUGH
Place the dough on a well-floured surface - the edge where you can see all the folds should be facing you.
Gently press the dough with a rolling pin along the length of it to make the dough and butter pliable.
Roll out the dough to about a 1 cm thickness (with an 8-9 inch width at the edge facing you).
Wrap the dough and refrigerate for about 30-45 minutes to allow the gluten to rest.
Roll out the rested dough to about a 4-5 mm thickness. Use flour to make sure the dough doesn’t stick to the surface.
I like to keep a width of about 9.5-10 inches and roll it out to a 4-5 mm thickness. Again, make sure the dough isn’t sticking to the work surface BEFORE you starting cutting the dough in the next step.
If, at any point, the dough becomes too soft or starts to shrink, wrap it and return it to the fridge for at least 30 minutes.
CUTTING THE DOUGH AND PROOFING
Cut a very thin strip along the long edges of the dough to have a width of 9 inches. Make sure the edges are straight and even. Use a pizza cutter or a sharp knife. Avoid dragging the knife along the dough as you cut it, as this can distort the dough. Simply press the knife or pizza cutter straight down to cut.
Along one of the long edges, make 3.5 inch markings. Then make 3.5 inch markings on the opposite edge as well, BUT these markings will be halfway between the markings along the first edge.
Use the ruler and a small sharp knife to connect the markings on the two sides with straight lines.
Using the marked lines as a guide, cut the dough with a pizza cutter or a sharp, long knife. You should end up with about 6 triangles, and a leftover piece.
Brush off excess flour from both sides of the dough triangle and keep it on the work surface.
Make a 1 cm cut at the mid point along the base of the triangle. Roll up the base, while gently pulling at the two corners to make the base slightly wider. (The cut that was made along the middle of the base helps with this.)
Once you have rolled up the base once, then you can roll up the croissant the rest of the way more easily. Make sure the tip of the triangle is properly centered the whole way.
Also make sure not to roll out the croissant too tightly or too loosely.
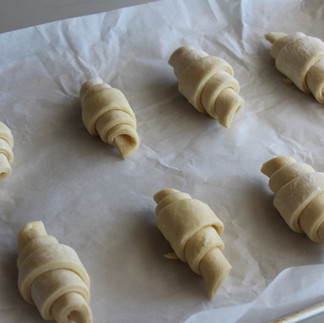
Place the rolled up croissant dough on the lined half sheet baking pan (6 on a tray), while making sure the tip of the croissant triangle is placed under the croissant. Gently press on the croissant to seal the tip at the bottom into the dough (take care not to squash the croissant!).
Cover with plastic wrap, and another half sheet pan on top. Make sure there's plenty of space within the baking pans so that proofed croissants don’t stick to the half sheet pan on top.
Proof the croissants somewhere that is warm, about 77°F, until doubled in size. The time can vary depending on the weather. I proof mine inside an oven with just the light turned on, and it still takes me between 2 - 3 hours.
The croissants have proofed if they have doubled in size, look very pillowy, and will jiggle a little when you give the sheet pan a shake.
BAKE
Preheat the oven to 375°F, at least 30 minutes before baking the croissants.
Mix the egg yolk and milk together to form the egg wash.
Brush with an egg wash (use a soft, small pastry brush, because the croissants are very delicate at this stage). Bake at 375°F for about 20-30 minutes until golden brown. Turn the tray once halfway through the baking time, if needed.
Remove from the oven and let them cool for a few minutes before transferring the croissants onto a cooling wire rack. Then let them cool down further to allow the insides to set (otherwise the croissants will be too soft).
DOUGH


Dissolve the honey in the milk in a mixing bowl, and then whisk in the yeast. Set aside for the yeast to activate for about 10-20 minutes.


Add the rest of the ingredients into the bowl in the order listed in the ingredients list. Stir with a spatula or spoon to mix it into a scraggly dough.
Using your hand, knead the dough for about 1-2 minutes until a scraggly dough is formed.
Take the dough out of the bowl and knead it on a work surface until smooth, about 4 minutes. You shouldn’t have to put too much effort into kneading here because it isn’t a very stiff dough. Place the dough back in the mixing bowl and cover with plastic wrap.
Keep the bowl in a warm place, and proof until at least doubled in size (this can take about 1 hour).
After the first proof, turn the dough out onto a lightly floured surface and flatten it to knock out the air. Transfer the dough onto the second (larger) parchment paper and shape it into a rectangle. Fold the other half of the parchment paper over the dough, forming a 7x10 inch case. Use a rolling pin to roll out the dough to fit the 7x10 inch rectangle. (It doesn’t have to fill the 7x10 inch rectangle perfectly, just as closely as possible).
Cover the parchment paper encased dough well in plastic wrap, and place it in a quarter sheet pan. Freeze for at least a few hours, or overnight.
BUTTER BLOCK


Slice the cold butter into thin slices.
Arrange them on the 1st parchment paper (the smaller one), within the 5x6.5 inch marked rectangle. Fold the parchment paper over to enclose the butter.
Using a rolling pin, firmly hit the butter to make it more pliable. Then, using the rolling pin, roll out/spread the butter inside the parchment paper.
Make sure to roll the butter out into the corners, but also keep the butter evenly thick.
Transfer this butter block into the fridge until completely hardened (or overnight).
ENCLOSING THE BUTTER


When laminating the butter and dough, it’s REALLY crucial that they both have similar pliability and are cold. If my dough is frozen solid, I keep it at room temp. for about 30 minutes to let it soften slightly, before starting the lamination process.
The butter block is removed from the fridge just before lamination, but made pliable by knocking a rolling pin against it repeatedly. It should remain cold.
Remove the parchment paper from the dough and place it on an un-floured (or very lightly floured) work surface. If it’s not quite a 7x10 inch rectangle, roll it out to the correct size, making sure it’s still evenly thick.
Unwrap the parchment paper from the butter block, but keep the butter still attached to the parchment paper.
Place the butter block on one half of the dough. There should be a very small border around the butter block and it should still have the parchment paper on top. Once the butter is correctly in place, pat it onto the dough to let it “bind” to the dough. Carefully peel off the parchment paper.
Fold the dough over the butter, end to end, completely enclosing the butter. Press the edges to seal the butter inside the dough. Pat the dough again to help the butter “bind” to the dough.
The dough should still be very cold. If it isn’t, wrap it and put it back in the fridge for about 30 minutes.
FIRST LAMINATION (DOUBLE FOLD)


Generously flour your work surface and dough. Place the dough on the work surface and using the rolling pin, gently press, along the length of the dough, to make sure the butter is pliable.
While maintaining the 5 inch width (short end), roll out the dough to a length of approximately 16 inches.
Use flour as needed to make sure the dough doesn’t stick to the counter, and use your hands to keep the width even and straight. (You can also gently lift the dough as you roll to make sure it isn’t sticking to the countertop).
Work quickly to keep the dough and butter cold. If the butter softens too much, return the dough to the fridge or freezer.
Brush off excess flour on the work surface using a large pastry brush. Trim just a little piece of dough along the edges, to make the width straight.
Fold in about ⅛ of the dough towards the middle (about 2-3 inches). Bring the other end to meet the folded end. Make sure the two ends are as close together as possible with no gaps. Using a paring knife, make small cuts at the four corners of the folds to release the tension (4 cuts; please see pictures in the post).
Brush off excess flour on the surface of the dough. Now, fold the dough in half. Firmly tap the dough to keep the shape. Again, make cuts at the corners of the fold (2 cuts).
Wrap the dough with plastic wrap and refrigerate for at least 30 minutes (60 minutes is even better).
SECOND LAMINATION (SINGLE FOLD)


Generously flour the work surface and place the dough on it. Gently press into the dough with a rolling pin along the length of it to make sure the butter inside is pliable.
Keeping the short end as the width (about 4 inches), roll out the dough to 15 inches. As you roll out the dough, make sure the final width is kept to about 5 inches. Also make sure the dough isn’t sticking to the work surface, and the width is straight and even.
Brush off excess flour from the surface of the dough using a pastry brush.
Fold in ⅓ of the dough towards the center, about 5 inches. As before, cut the corners of the fold with a paring knife to release tension.
Brush off excess flour again, and fold the other edge of the dough OVER the first fold. Cut the folded corners with a paring knife to release tension.
Wrap the dough in plastic wrap and refrigerate for another 30 minutes (preferably 60 minutes).
SHEETING THE DOUGH


Place the dough on a well-floured surface - the edge where you can see all the folds should be facing you.
Gently press the dough with a rolling pin along the length of it to make the dough and butter pliable.
Roll out the dough to about a 1 cm thickness (with an 8-9 inch width at the edge facing you).
Wrap the dough and refrigerate for about 30-45 minutes to allow the gluten to rest.
Roll out the rested dough to about a 4-5 mm thickness. Use flour to make sure the dough doesn’t stick to the surface.
I like to keep a width of about 9.5-10 inches and roll it out to a 4-5 mm thickness. Again, make sure the dough isn’t sticking to the work surface BEFORE you starting cutting the dough in the next step.
If, at any point, the dough becomes too soft or starts to shrink, wrap it and return it to the fridge for at least 30 minutes.
CUTTING THE DOUGH AND PROOFING


Cut a very thin strip along the long edges of the dough to have a width of 9 inches. Make sure the edges are straight and even. Use a pizza cutter or a sharp knife. Avoid dragging the knife along the dough as you cut it, as this can distort the dough. Simply press the knife or pizza cutter straight down to cut.
Along one of the long edges, make 3.5 inch markings. Then make 3.5 inch markings on the opposite edge as well, BUT these markings will be halfway between the markings along the first edge.
Use the ruler and a small sharp knife to connect the markings on the two sides with straight lines.
Using the marked lines as a guide, cut the dough with a pizza cutter or a sharp, long knife. You should end up with about 6 triangles, and a leftover piece.
Brush off excess flour from both sides of the dough triangle and keep it on the work surface.
Make a 1 cm cut at the mid point along the base of the triangle. Roll up the base, while gently pulling at the two corners to make the base slightly wider. (The cut that was made along the middle of the base helps with this.)
Once you have rolled up the base once, then you can roll up the croissant the rest of the way more easily. Make sure the tip of the triangle is properly centered the whole way.
Also make sure not to roll out the croissant too tightly or too loosely.


Place the rolled up croissant dough on the lined half sheet baking pan (6 on a tray), while making sure the tip of the croissant triangle is placed under the croissant. Gently press on the croissant to seal the tip at the bottom into the dough (take care not to squash the croissant!).
Cover with plastic wrap, and another half sheet pan on top. Make sure there's plenty of space within the baking pans so that proofed croissants don’t stick to the half sheet pan on top.


Proof the croissants somewhere that is warm, about 77°F, until doubled in size. The time can vary depending on the weather. I proof mine inside an oven with just the light turned on, and it still takes me between 2 - 3 hours. (The left photo is the croissants prior to proofing and the following two are proofed).
The croissants have proofed if they have doubled in size, look very pillowy, and will jiggle a little when you give the sheet pan a shake.
BAKE


Preheat the oven to 375°F, at least 30 minutes before baking the croissants.
Mix the egg yolk and milk together to form the egg wash.
Brush with an egg wash (use a soft, small pastry brush, because the croissants are very delicate at this stage).


Bake at 375°F for about 20-30 minutes until golden brown. Turn the tray once halfway through the baking time, if needed.


Remove from the oven and let them cool for a few minutes before transferring the croissants onto a cooling wire rack. Then let them cool down further to allow the insides to set (otherwise the croissants will be too soft).


When cut or ripped open you should have layers of flaky buttery croissant!
While croissants are very time consuming, I think they are a labor of love that are truly worth it.

If you plan on saving this recipe for later via Pinterest, feel free to use this image!
Please tag me if you end up making this recipe, I would LOVE to see how it turns out!!

I also have a nice cheat sheet if you want a quick guide to reference after you get the process down!
Which I absolutely plan on using the more I make croissants!
Of course, this cheat sheet is particular to this recipe and method so I am eager to try other ways of making them.


Comments