SOURDOUGH DISCARD BISCUITS
- Sam

- Feb 26
- 5 min read

I personally hate the idea of discarding any sourdough starter and I actually don't discard very much since I try to plan my baking schedule around feedings. That being said, there are definitely times when I need to discard and its never nice to toss something that can definitely still be used!
So I went straight into Pinterest recipe hopping for some guidance. I got this recipe from Wild Thistle Kitchen and found it really easy to make! The biscuits are soft, flaky, and have a nice tang. They are the perfect use for sourdough discard and really add a nice subtle flavor to a classic biscuit.
I enjoy using them for a Chick-fil-A-style breakfast sandwich, a standard breakfast sandwich, or as a dessert paired with ice cream! They serve as a great foundation for various snacks or meals, savory and sweet.
INGREDIENTS
1 cup Sourdough Discard
½ cup Whole Milk plus a bit more for brushing
2 cups All Purpose Flour
1 tbs. Baking Powder
¼ tsp. Baking Soda
½ tsp. Kosher Salt
1 tbs. Granulated Sugar
8 tbs. Unsalted Butter, very cold
INSTRUCTIONS
Mix sourdough starter and milk together in a glass measuring cup and set aside.
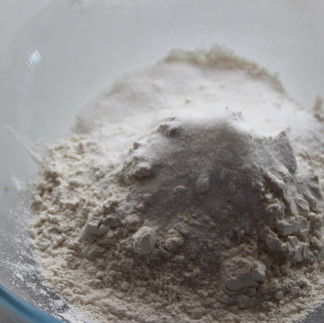
Mix flour, baking powder, baking soda, salt, and sugar in a mixing bowl.
Add the cubed butter to the flour mixture. Using your fingers press the butter flat and toss in the flour until every piece is flat. You can also use a pastry cutter but your fingers definitely give the best results for flaky layers.
Drizzle in milk and starter mixture while stirring with a fork until a shaggy dough forms. If you feel your dough is wet enough, you may not need to add all of the mixture - this will strongly depend on how hydrated your starter is.
Dump your dough onto a floured surface. Shape dough into a rectangle about 1 inch thick.
Divide in half and stack one half on top of the other and press again into a 1-inch thick rectangle. Repeat this one or two more times to create more layers. Work quickly as the butter will get to room temperature quickly.
After stacking a few times, press dough into a 1-inch thick rectangle one final time and chill in the freezer for 30 minutes. Alternatively you can cover and refrigerate overnight or up to 48 hours.
When dough is chilled and you are ready to bake, preheat oven to 400 degrees F.
After dough has chilled, cut into biscuits with a floured 2 ½ inch cutter. Or you can cut the rectangle into 9 squares. Do not twist your cutter. Just go straight down and back up. Likewise if you are cutting with a knife or bench scraper, don't use a sawing motion - just go straight down and back up.
Reshape any scraps by stacking them on top of each other and pressing down to a 1-inch thickness before cutting.
Place biscuits on parchment lined tray very close together but not touching. Brush tops with milk. If using these for something sweet like shortcakes, a sprinkle of sugar on top is nice, (demerara sugar for that crunch!).
Bake in preheated oven until golden and no wetness shows on the sides. This will take 15-18 minutes.
Short Term Make Ahead Option: Once you get to the point of having the biscuits shaped, you can cover them tightly and place in the refrigerator for up to 48 hours before baking. If your starter is pretty active you will also get some fermentation benefits during this time and you'll have a tangier tasting biscuit.
Long Term Make Ahead Option (freezer): If you want to freeze these biscuits to bake at a later date, get them shaped and freeze them on parchment in a single layer. Once frozen solid transfer the biscuits to freezer bags or containers. Bake from frozen within 3 months.
Baked biscuits will keep at room temperature in an airtight container or bag for 2-3 days. They can be stored in the refrigerator for up to 5 days. Baked biscuits can also be frozen for up to one month if wrapped very well.


Mix sourdough starter and milk together in a glass measuring cup and set aside.
Mix flour, baking powder, baking soda, salt, and sugar in a mixing bowl.


Add the cubed butter to the flour mixture. Using your fingers press the butter flat and toss in the flour until every piece is flat. You can also use a pastry cutter but your fingers definitely give the best results for flaky layers.


Drizzle in milk and starter mixture while stirring with a fork until a shaggy dough forms. If you feel your dough is wet enough, you may not need to add all of the mixture - this will strongly depend on how hydrated your starter is.
Dump your dough onto a floured surface. Shape dough into a rectangle about 1 inch thick.


Divide in half and stack one half on top of the other and press again into a 1-inch thick rectangle.
Repeat this one or two more times to create more layers. Work quickly as the butter will get to room temperature quickly.
After stacking a few times, press dough into a 1-inch thick rectangle one final time and chill in the freezer for 30 minutes. Alternatively you can cover and refrigerate overnight or up to 48 hours.


When dough is chilled and you are ready to bake, preheat oven to 400 degrees F.
After dough has chilled, cut into biscuits with a floured 2 ½ inch cutter. Or you can cut the rectangle into 9 squares. Do not twist your cutter. Just go straight down and back up. Likewise if you are cutting with a knife or bench scraper, don't use a sawing motion - just go straight down and back up.
Reshape any scraps by stacking them on top of each other and pressing down to a 1-inch thickness before cutting.
Place biscuits on parchment lined tray very close together but not touching.


Brush tops with milk. If using these for something sweet like shortcakes, a sprinkle of sugar on top is nice, (demerara sugar for that crunch!).


Bake in preheated oven until golden and no wetness shows on the sides. This will take 15-18 minutes.


Short Term Make Ahead Option: Once you get to the point of having the biscuits shaped, you can cover them tightly and place in the refrigerator for up to 48 hours before baking. If your starter is pretty active you will also get some fermentation benefits during this time and you'll have a tangier tasting biscuit.
Long Term Make Ahead Option (freezer): If you want to freeze these biscuits to bake at a later date, get them shaped and freeze them on parchment in a single layer. Once frozen solid transfer the biscuits to freezer bags or containers. Bake from frozen within 3 months.
Baked biscuits will keep at room temperature in an airtight container or bag for 2-3 days. They can be stored in the refrigerator for up to 5 days. Baked biscuits can also be frozen for up to one month if wrapped very well.


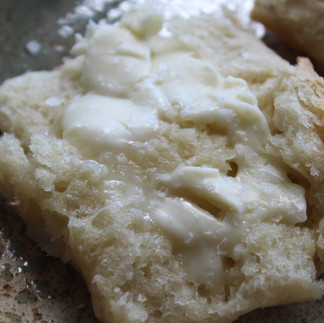
These biscuits perfectly blend the strong sourdough flavors with a flaky, buttery texture. With flaky buttery layers, I still can't help but add more butter and a sprinkle of flaky salt.


If you haven't tried a bacon and egg breakfast sandwich with a little jelly on it, you must prioritize that for your next breakfast. Nonetheless, still really loving these biscuits and will absolutely throw them into the rotation when I have some sourdough starter to discard!

If you plan on saving this recipe for later via Pinterest, feel free to use this image!
Please tag me if you end up making this recipe, I would LOVE to see how it turns out!!


Comments